With the engine built I could now call a friend to help with putting it in the car. Engine swaps are a proper two man job so help was needed. Fred Brunsdon is an old mate from my rallying days and who has serviced for me on lots of rallies was available, so he called by on a Saturday to get the job done.
I had already got most of the old standard motor connectons undone or ready so it came out easily and the new one was readied to go in.
 |
| Ready? | |
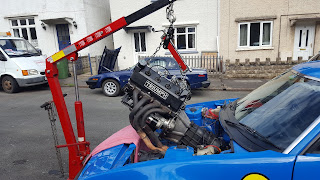 |
| Steady |
 |
| It's in |
The exhaust lined up nicely and it was then just a case of connecting all the usual pipes and wiring. There was one different pipe because the manifold is not water heated like a standard one so the heater feed goes directly from the water pump outlet round to to the heater inlet. This picture expleins it, sorry about the greasy lens on the camera!
 |
| Heater feed direct from the water pump outlet |
The carbs could now go on with the fuel feed an I included an inline filter as an extra precaution. I had decided to fit an electric fan so that was attached to the radiator using the normally supplied fixings through the radiator. (These fixings later turned out be a poor choice - see Lombard Rally Bath 2019 report). But it was beginning to look like a proper job
 |
| Dellorto DHLA45s on |
 |
| Air filters and electric fan fitted |
 |
| View from left side |
Filling a new engine with oil and water is always an exciting but nervous moment but nothing ended up on the floor so that was a good sign. Testing the Lumenition prior to try starting the motor revealed a snag when I found that I couldn't turn the distributor quite far enough, maybe because I had the jackshaft timing a little out, so what to do? Taking the distubutor out and turning it one tooth was too much so I came up with a Plan B. I decided to modify the distributor mounting adapter plate by adding some additional threaded holes so it allow the distibutor to be turned a little more. Cunning plan, and it worked !
 |
| My distributor mounting plate with additonal threaded holes | | |
With the Lumenition all connected I could now get it to produce a spark at around 10 degrees BTDC and I felt comfortable to try and start it. I had already spun it over with the plugs out to get some oil pressure so replaced the plugs and it fired up without too much trouble. Excellent stuff, so now I let it warm up briefly then cool down overnight so I could re-torque the head bolts/nuts with it all cold.
Next morning I re-did the head bolts/nuts but also found a couple of problems. Main thing was several water leaks. One seemed to be coming from the temperature sender, one from the usual water pump slot in the block but the main one was on top of the block and seemed to be coming from the pump link pipe. The minor leak from the water pump slot was not too big a worry as it is quite common with a new water pump and usually settles down. But it still meant I would have to take the carbs and inlet manifold off - curses!
 |
| Evidence of leak from temperature sender |
 |
| Signs of a leak from by-pass pipe |
The temperature sender just needed some PTFE tape on the thread so I did that first then took the whole manifold and carbs off to fix the bypass pipe problem. I had used a brand new link pipe and obviously with some new "O" rings so that was a bit of a puzzle. Inspecting the link pipe and comparing it with the other used ones I had it appeared to be a few thou smaller diameter in the grooves where the "O" rings sit. I decided to use one of the good spares and put it all back together with some extra magic gasket then let it set overnight before refilling the system. Everything crossed.
Next day I ran it up to temperature again and things had settled down with only a couple of tiny drips.
Now I needed to run the car for a while to put some miles on it and see how it all worked.


