Showing posts with label Sprint. Show all posts

Wednesday, 3 April 2019

2018-2019 Winter Jobs 2. Sprint Engine - Problems

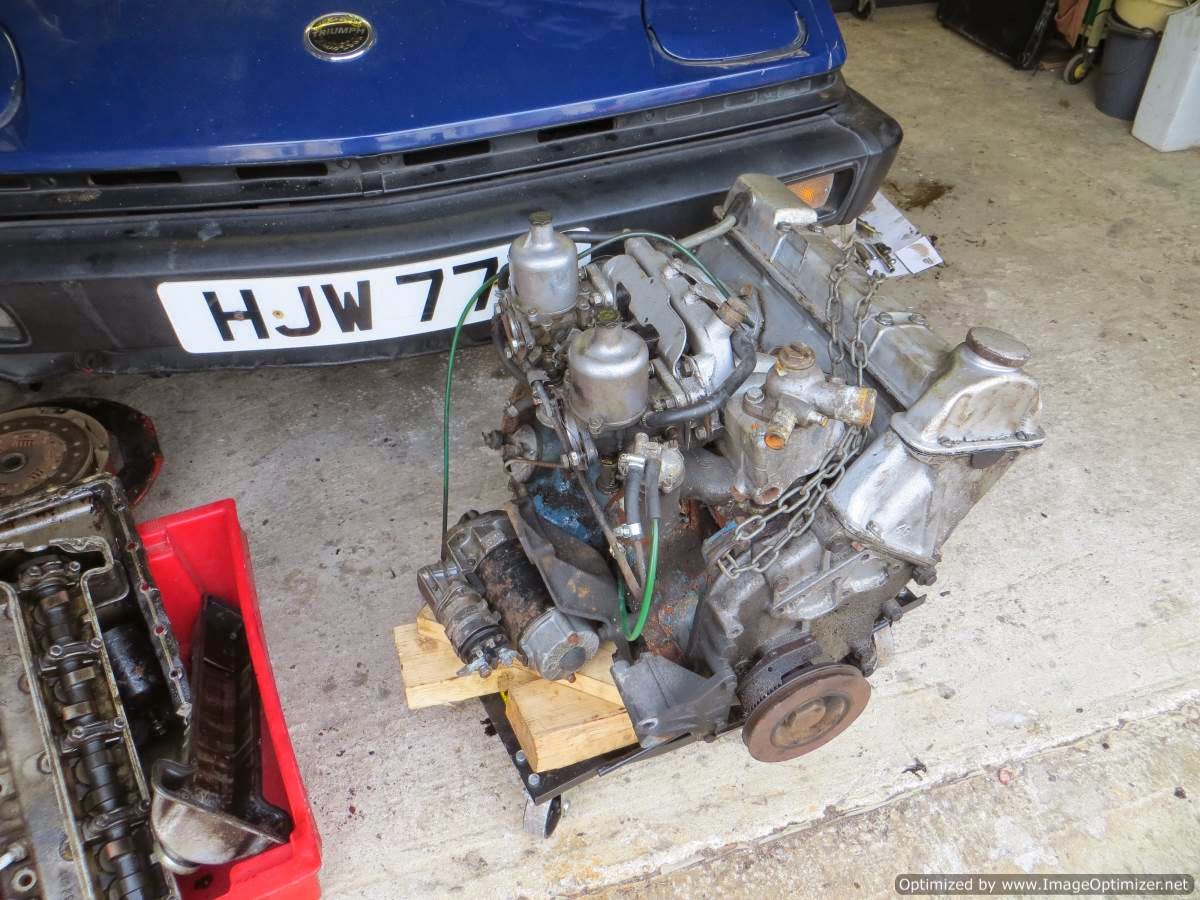
I had found a Sprint engine that had been used in a TR7 rally car and bought it for a "reasonable" price so the plan was to give it a quick check it over and fit the engine in the FHC over the winter.
TR7 Sprint Rally Engine
It was running on 45DCOE carbs with a fast road cam etc etc so should be good for about 160-170bhp. Naturally there were a few things I wanted to check and it turned out to be a bit more work than expected.
First thing I noticed was the cam sprocket support bracket was missing. This holds the sprocket in place and allows you to work on the cam without taking the chain off,  like when you need to alter the tappet shims. Not a good sign.
There should be a guide pin in the middle of that sprocket!
Next thing I spotted was that one of the 14 bolts holding the rocker gear to the head was metric. Just one, but it should have been UNC thread!  Why would you put one odd bolt in?

Metric bolt, that should not be in this engine!
Another bad sign, so I now knew whoever built it was either in a big hurry or they didn't know what they were doing.
Either way it prompted me to completely strip the engine to see if I could find any more things to worry about and I soon noticed there was way too much end float on the crankshaft.  I found it because there was a loud "clonk" when I turned the engine upside down on the stand as the weight of the crank assembly made it to slide sideways in the main bearings . It should have been between 0.003"-0.011" but it was more like 0.020". This meant incorrect size thrust washers were used.

At this point I decided it would be best to "park" this engine for the time being and go back to the one I had started to build back in 2014. The quick swap job was back to being a big build after all.


Tuesday, 14 October 2014

September 2014 - Engine transplant

My planned new uprated motor project is still delayed, holidays are approaching and the Blue car MOT is due soon - but it has no engine so what to do?
Answer: Swap the Sprint engine out of the old red car that will be scrapped soon.
Here it comes.

Sprint engine in its new (temporary) home.
We actually took the engine and box out in one go and swapped them straight into the blue car with only a pause for a cup of tea in between.  The car passed its MOT next day and went to the Tetbury Classic Car show the day after that.  Couldn't have been too bad because our club got the award for the best club stand at the show!
GLAVON group TR Register stand.
Since the show I have tidied up a couple of more items and swapped it onto the Minilite look-alike wheels that I intend to use.  The old Montego criss-cross ones have been sold.
Sort of finished look.

 Another "little" problem I forgot to mention is that the hood will not fold down because it fouls on the roll hoop. This is very annoying because it means the hoop will have to be repositioned/lowered to suit. Not an easy task as it will mean re-drilling the side mounting plates on the hoop.
I had naively thought that those pre-drilled holes in the hoop and the existing captive nut in the body are supposed to go together - but it seems not.
Luckily with winter approaching the top can stay up most of the time for the moment. I have enlisted a couple of friends and they will help realign the hoop while it is re-drilled to a new and lower position. Needs a nice dry day when we can all get together but no rush for the moment. 

Friday, 10 October 2014

February 2014. Blue car - New engine story begins

Sorry but its been a while since my last entry but I got a bit sidetracked by life, its got a habit of getting in the way of doing things on the car.

Anyway, in February 2014 I mentioned on the TR7 and Dolomite forums that I would have a standard 2.0 litre engine and stainless exhaust for sale. Almost immediately a guy from Brighton with a Toledo got in touch and wanted the engine, and a Welsh chap wanted the exhaust. Problem was it was all still in the car. Big rush over the weekend and the stuff was on the garage floor ready for collection.
 
No going back now!


 .......................................................................................

 I had already sourced a running Sprint engine from a very rusty Sprint automatic and that has been stored in the back of the garage for the past year.  The plan was to rebuild it with some mods to give it a bit more power. Turns out the engine had been rebuilt after some kind of mechanical "accident". the block and bottom end were excellent but the head had been damaged in no.4 chamber.

No.4 chamber on the left has material missing below the exhaust valves

Then I was offered an engine with a stage 2 head, fast road cam, twin Weber manifold and very little use - I was tempted.
 
Having decided to go for the Stage 2 engine I collected it from near Heathrow and had to dodge the floods all around the area, remember that?   I obviously intended to give it a good look over before using it and turns out it was a very good job I did.

Stage 2 engine looking good
Still looking good.
OK, this is not so good.
No pad on the tensioner!
TR7 8 valve pistons.
Well as you can see from the pictures the stage 2 engine turned out to be a nightmare. Whoever had built the engine was no kind of engineer or mechanic.  Every part I took off showed evidence of zero mechanical sympathy.
To list just a few of the things I found:- There were huge amounts of a black sealer which had hardened and got everywhere as you can see from the build up in the sump. The engine had an electric water pump conversion but the adapter fittings had been bodged. The timing chain tensioner had lost its rubber pad and the pistons were standard 8 valve TR7 ones.
The head and cam seemed OK, with some cleaning up of the ports. Enquiries revealed the head had been done by S&S so should be good. The cam was a Kent Cams DMS1 which is a fast road profile but was a re-profiled one so will need thicker shims.

So, decision time, what to do.  The best idea seemed to be to simply use the best parts of both engines, the bottom end from the rusty Sprint auto with the head and cam from the stage 2 engine. The moving parts were all dropped off at Maynard Engineering to be balanced and all was going well until I discovered some slight water damage in the block where I had kept it on its side for the past year or so. Obviously a small amount of water had got into the chamber - bugger!  The marks were just too deep to polish out so that cylinder would now need a liner.  this meant the block now went down to Maynards as well.
Water damage in block. Too deep to polish out.

Tuesday, 14 May 2013

2012 Sprint engine update and Oil Pressure gauge

 Running around trying out the Sprint engine was good fun. It is a smooth torquey engine and I just love the way it revs.  The only thing I started to notice when the initial grin started to fade was a few rattles and noises that weren't there before. The exhaust system would knock on the floor sometimes and I had also found a mark on the inside of the bonnet (hood) where the oil filler cap was just touching.

Several attempts to rearrange my cobbled up exhaust system proved useless, and it was too close over the axle area,  so I decided to buy a complete new system that I knew would fit properly.  S&S supplied a very nice complete new stainless system including manifold and mounting rubbers, but at around £500 it was not cheap!
Fitting the system was very easy apart from the manifold.   The new engine has studs in the head instead of bolts which I think is a good idea, but the clearance issue ( see picture ) means there is not enough room to
 Nice new stainless manifold - but close to chassis
get the manifold on/off the studs.  The only way is to undo the engine mounts to tip it over and then it would just go on.  I also used brass nuts on the studs to avoid any sticking problems later.

When I asked S&S about the clearance to the chassis rail they told me that folks tend to use a bit of heat and a hammer to "modify" the manifold.  I thought this was a bit brutal having just paid good money for it but found another way on one of the forums by a small machining job on the right side engine mount - see pictures below.


engine mount before - block side

and after


engine mount before - chassis side
and after

About 5mm is machined off each side of the mounting as shown in the pictures.  The effect of the machining is to make the engine "lean" slightly to the right and away from the chassis rail.


Enquiries about the bonnet clearance revealed that the usual trick is to use TR8 spacers between the subframe and chassis rails.   These are basically just a thick washer (about 10mm) which drops the subframe by the same amount relative to the body. Easy fix and took less than 30mins to do.

     ------------------------------------------------------------------------------

Forgot to mention earlier, somewhere in amongst all these goings on I managed to find time to fit an oil pressure gauge in place of the clock. The car always had a gauge fitted low down by your left knee - a useless place - so I moved it to somewhere you can now see it.. I used a old Smiths classic full scale 0-100 psi capillary. gauge. Quite a simple job, just a bit of fitting/cutting out some plastic in the back of the instrument pod to get it sitting nicely in place..

Oil Pressure now clearly visible.


Sunday, 12 May 2013

2012 Sprint engine installed

All the usual hoses and wires connected up to the new Sprint motor with no problems but I had to fiddle about with the exhaust.  I had used the scruffy mild steel manifold that came with the engine and the car already had a stainless sports system so I had to make up a sleeve to join the two together. Not difficult but getting it all lined up and hanging nicely was a hassle.


I had read the clearance between the manifold and the chassis rail is sometimes a problem but I had a whole quarter of an inch!


I cranked it over on the starter a couple of times and saw oil pressure on the gauge so the big moment came - and it fired up easily after a couple of turns.  Phew !!   No nasty noises and no more smoke than usual with a new engine installation. Excellent.
Let it run for a couple of minutes and then checked around for any leaks the noticed the oil pressure was a bit high, in fact, much too high.  I was seeing  80psi running and even 65-70psi at tickover. Hmmm.

This seemed it might be a problem so I asked around on the Triumph Dolomite Club forum and they all agreed too much for a normal engine.  The consensus pointed to the oil pump so I whipped it off and found someone had fitted an uprated spring in the relief valve. It was longer and stronger than standard. This might be OK for competition but really not necessary for a normal engine and can cause premature wear to the timing chain tensioner so I just swapped to a standard one and normal pressure was restored.  I now had about 55psi running and 35-40psi at tickover.  Much more comfortable.

Completed Sprint engine installation

A quick road test found it was a bit flat above 3000rpm so I obviously needed to get the carbs and timing set up properly but otherwise everything worked OK..  It ran sweetly enough but needed a tune.  At this stage it still had not got the air filters and it was on standard needles so I booked a session on my local rolling road to get it running just right.

Couple of days later, K&N filters fitted, I took it to Maynard Motorsport rolling road in Nailsworth to sort it out properly. I have known Mark Maynard for years since before I rented some space in a spare corner of his workshop to build my Sierra Cosworth rally car in the early 1990's. He has a good engineering machine shop and can make almost anything you need for a car.

If you have never been to a rolling road it is a bit of a shocking experience first time.  The sheer noise and violence of a car running flat out whilst you stand a couple of feet away is pretty scary. You will not believe how loud it actually is.  I knew what to expect but it had been a few years, so I stood back with my fingers in my ears, whilst the car was given a good thrashing. Carb needles were swapped for some richer ones to match the K & N filters and the tubular manifold and ignition timing adjusted slightly to optimise everything.  Needles fitted are now BBP.

Result was 134bhp at 5800rpm and a smooth flexible engine, see printouts below.


Wednesday, 20 February 2013

2010, Another TR7 arrives

The car had always looked OK from across the road, but a closer inspection would reveal the previous owners welded patches, and the fact that the doors have been repaired and aren't aligned quite right, and the rust bubbles on the rear deck seams, etc etc etc. Under the bonnet the welded patches on the inner wings and turrets were very obvious.  It was all sound but not too pretty.

When I took it to my local garage for its MOT they noticed something else that I hadn't spotted. The flat tops of those rear chassis rails under the boot floor were starting to bubble.  I had never looked at them before but there was no mistaking the first signs trouble when you ran your hand along the top.  I treated them with some rust killer and paint immediately but it meant the bodyshell would need some proper attention if it was going to last for many more years.

A couple of days after the MOT, as I was walking past the local garage they called me in and asked if I knew anyone who wanted a TR7. It was local, been stored for years and the owner wanted rid of it.................
To cut a long story short I suddenly found myself with two TR7's

The "new" car was from 1981, Carmine Red and had done only 23000 miles. It was Zeibarted from new but had still needed door skins, sills and wheelarches done in the mid 1990's. The owner had lost his garage a couple of years previously and I think the car had been moved around lockups. The hood had split and closer examination also revealed it had got wet at sometime as the interior was not too good.  The panel repairs were good quality and the boot lid and bonnet were both good as new but it would need a respray to get it looking just right.


The plan would be to get the body painted and fitted out nicely, then change over all my good mechanical stuff with the new poly bushes, springs, dampers etc.  I also had plans to install a Sprint 16 valve engine.

The Sprint Option

Ever since I first had the TR7, people asked me when I was going to put a V8 in the car, but I always liked the Sprint option better.   A few of my reasons are:-
1..it is a lot less work therefore cheaper.
2..the Sprint engine has over 130bhp, similar to the standard V8 engine.
3..no changes to the bodyshell or gearing required.
4..there are loads of TR7 V8's about but not many Sprints.
5..the factory started making the TR7 Sprint but it never went into full production.

Its worth noting that all the TR7 factory rally cars were Sprint powered up until 1979.