With the new engine being away at Maynard Engineering I had quite a bit to keep me busy getting the car ready to receive it. The old engine and gearbox were out so that gave me the chance to clean up the engine bay and sort out the wiring. There was a surprising amount of dirt on the crossmember and chassis rails apparently due to oil leaks from the old motor/box. I also wanted to have a good go at the wiring in the engine bay to make sure the dreaded TR7 headlamps raised and lowered as they should. This is mainly a case of cleaning up all the plugs, contacts and the earth connections. I cleaned them all and gave them a coat of dielectric grease to improve connections and keep out water.
 |
| Not too bad, but now is the chance to tidy up |
It was also an opportunity to add relays to the headlight circuits. The headlight switch and dip switch contacts carry all the current to the lights. With the TR7 wiring being over 30 years old now these have all seen better days and with new halogen replacement light units they are prone to failure so its a good idea to install relays. These mean that the switch contacts only have to operate the relays which in turn carry all the main power. I made up a small panel which plugs into the standard harness so it can be removed to return to standard if required. The panel has a 4way auxiliary fuse box fed by a permanent live cable and three relays to serve main beam, dip beam and spotlights. The fourth fuse provides power to the Kenlowe electric fan.
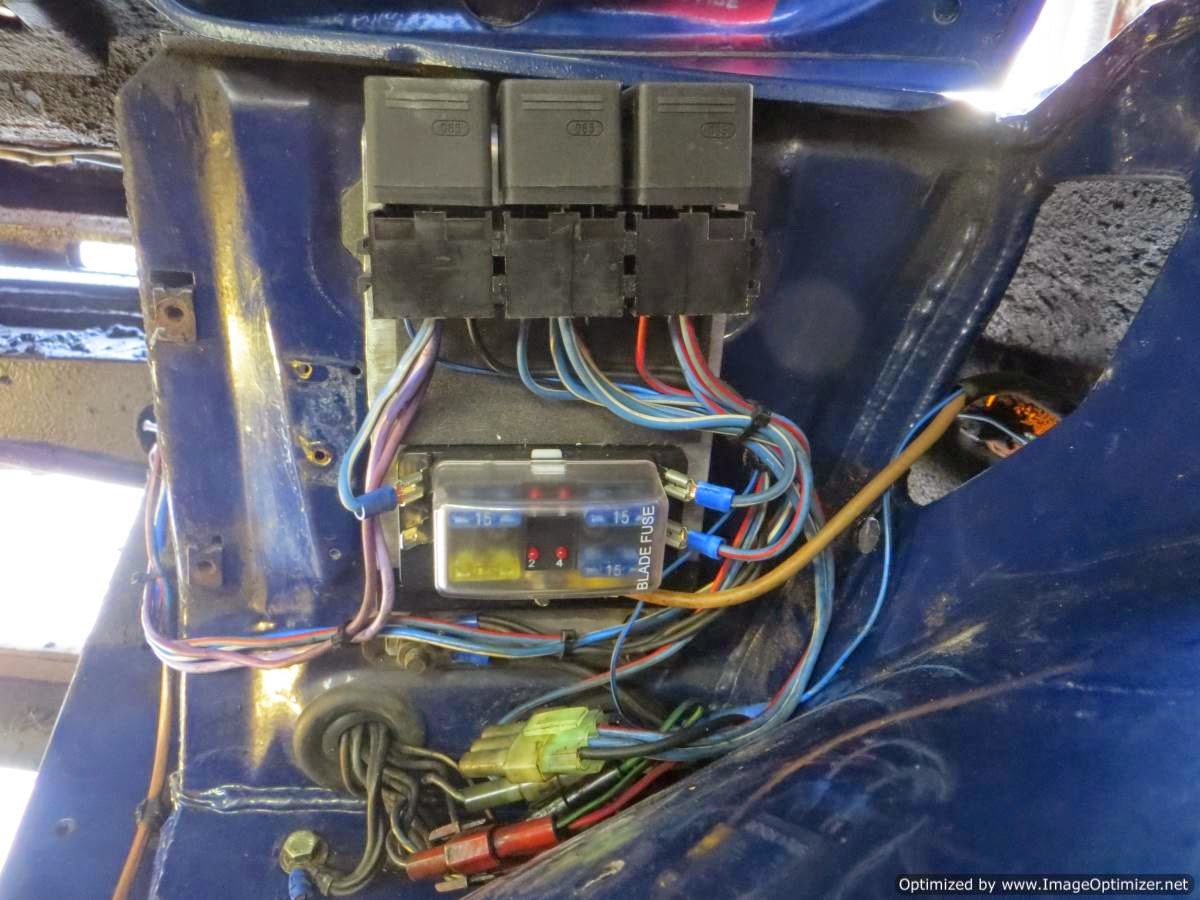 |
| Auxiliary fuse box and headlight relays |
After problems with a leaky fuel pump on the old car I decided it would be a good idea to fit an electric pump which would also be OK for the twin 45's on the new engine. Like several TR7 owners before me I used the redundant wiring for the heated rear window to feed the pump which is mounted close to the tank outlet. It also means you can switch it off when required. I chose a Facet low pressure pump which comes with a small inlet filter which I expect will need changing often so may be replaced with something bigger. It also seems a little noisy so will need mounting on rubber later.
 |
| Facet pump with its filter mounted under floor |
The front bumper had the usual TR7 droop problem and I found the rubber mounting blocks had failed completely allowing the bumper to be waggled quite a lot by finger pressure alone. There is masses of stuff written about ways to repair or replace these mounting blocks but the alternative is to use the bumper from a TR7 Coupe which doesn't have them. Its all about the original design of the cars back in the 1970's when they decided to include a "harmonic damper" on the DHC models to improve ride quality on country roads and which also includes quite large blocks of cast iron in the ends of the bumper. Simplest solution is to simply use the bumper off a Coupe which bolts straight onto the car and my old red car just happened to have Coupe bumper. Not any more - its now on the new one!
 |
| Droopy bumper |
 |
| No droop after Coupe bumper fitted. |
Testing the headlights and sidelights revealed the next problems. The drivers side headlight suddenly didn't work on main beam, but dip was OK. I was concerned my new relays were at fault but I found a nasty old repair in the wiring, its was wonder it had ever worked at all.
This was fixed by replacing the headlamp tail with a good one from an old headlight I had "in stock".
Next thing was the sidelights and dash lighting was intermittent. This fault was more illusive and took a while to locate but was finally traced to the fuse box. Sidelights and dash lighting are fed from the same fuse and I had blown it when I was messing with fitting the sidelights in the new bumper. I had replaced the fuse but this turned out to be the cause of the problem. It was a brand new shiny one I had recently bought but although it was the correct rating and length the diameter was about 0.020" smaller than the original Lucas one. Doesn't sound much but it meant the clips in the fuse box were slightly loose causing a bad and intermittent contact. I replaced it with an old dusty Lucas one and the fault was fixed!
Motto: new shiny stuff is not always good.
Another little job to do before the engine went in was to replace the foam seal on the fresh air intake to the heater. Its a bit fiddly to do but not so bad when you can stand in the engine bay to work! I just scraped off all the old crumbly foam and then glued some new stuff on. The new foam I used is about 2mm thick and often used to line the drawers in your toolbox but seemed to be just the thing here. Putting the vent to the "closed" position held it in place whilst the adhesive set. Now when I close the vent it actually stops cold air coming into the car when you don't want it. Excellent. At the same time I did the similar job on the fascia fresh air vents as well. They also work properly now.


