Showing posts with label Robsport. Show all posts

Wednesday, 13 May 2015

12th May 2015, Steering column lower bush

According to various owners replacing the bulkhead steering column bush is one of those TR7 jobs that can be a bit of a swine. Folks have resorted to all kinds of tricks to get it done or to avoid doing it.  Unfortunately the time had come to do mine so I ordered the kit from Robsport.
Robsport Steering Column Bush Kit.
 The new ones tend to be made from polyurethane these days and are pretty durable but the material is quite hard so not easy to install.  One of the suggested tricks is to boil it in hot water but that seemed to make no difference at all to my new one so a mechanical method seemed to be the next option. Before all this however, it was necessary to remove the column to gain access to the bulkhead.  In the BL Workshop Manual it says to take my note of the positions of the two washers at the lower end of the shaft. The problem was that there were no washers at all on my car ! Luckily I had kept the ones from the old car I scrapped recently so I could use those. The top bushes just below the steering wheel had been replaced before and were in excellent condition so I left those alone.
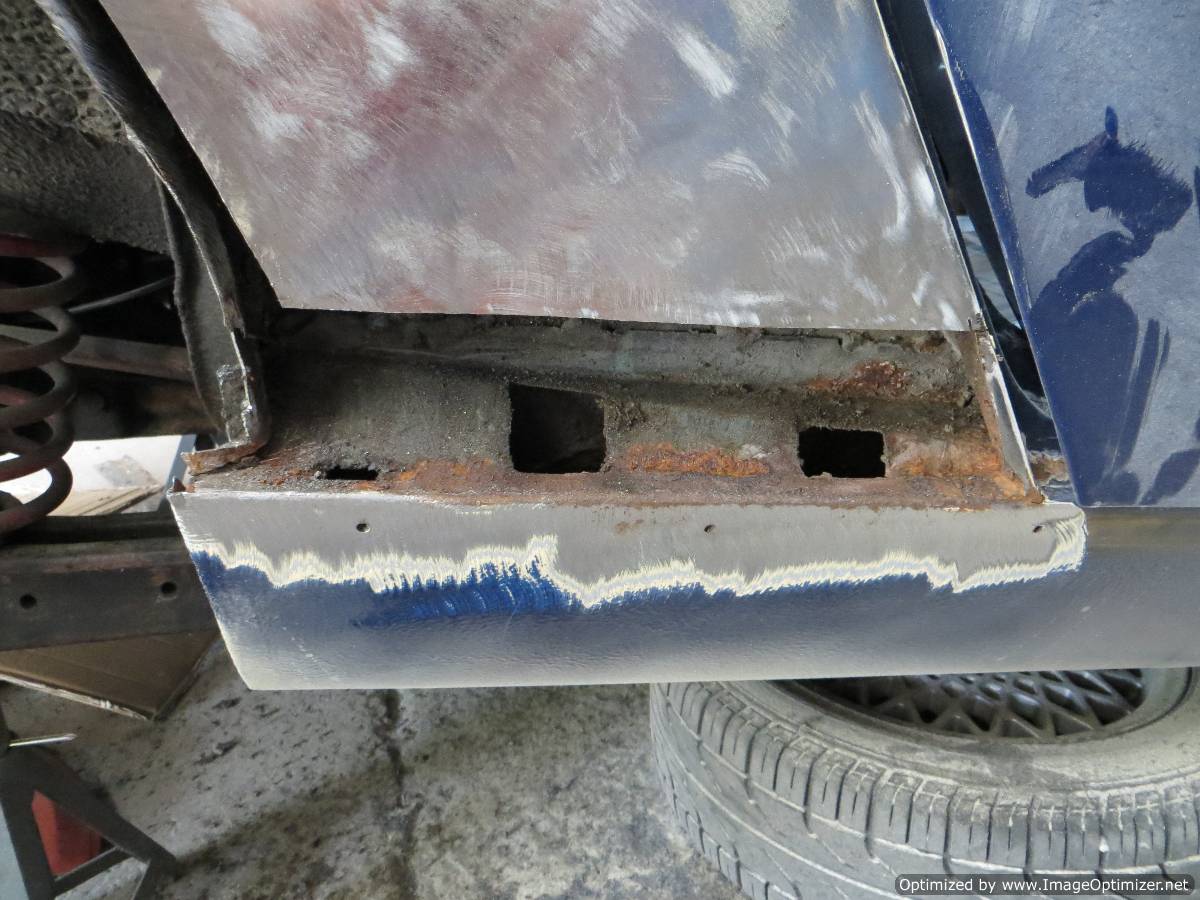
The lower bush has to be inserted from the engine side of the bulkhead and as my car is complete and running, access space to the area is limited by carbs, brake pipes, etc.  I tried the usual ways to insert a grommet like using a flat blade screwdriver or starting one spot and twisting it in like a screw etc. but all these attempts proved fruitless.  It obviously needed a way to hold the bush in position and push it home at the same time.  Enter Special Tool no.2.
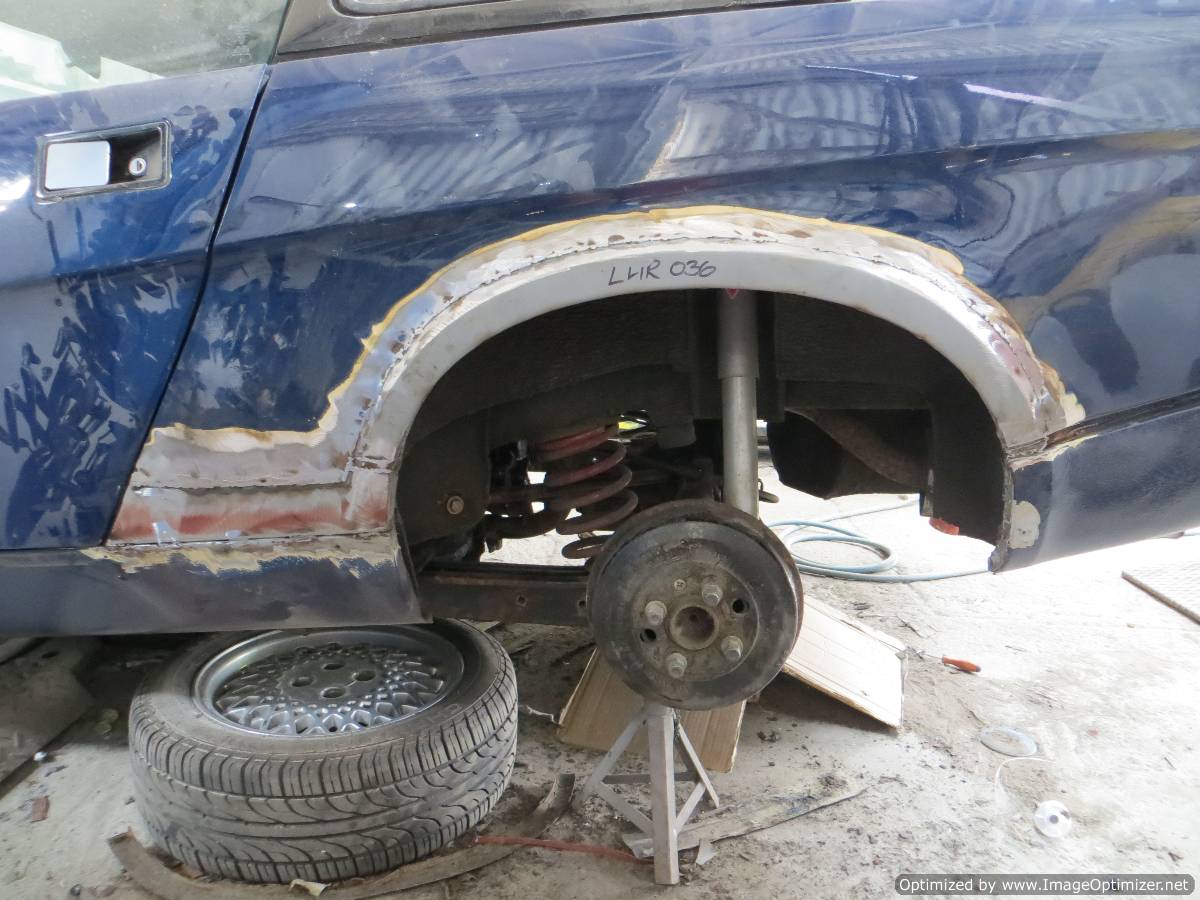
Special tool no.2. Steering column bush inserter.
It only took 5 minutes to make the tool shown in the picture. Its just a piece of wood about 6-7" long with the end shaped to go through the bush and hold it in place. The washer is the actual one that goes next to the bush and provides a smooth flat surface when pushing it in.  I just held it in position and used another piece of wood about 2 feet long as a lever against the engine mounting bracket and the bush popped in quite easily.
Obviously this will not work for you guys with a LHD car or a TR8. Sorry.
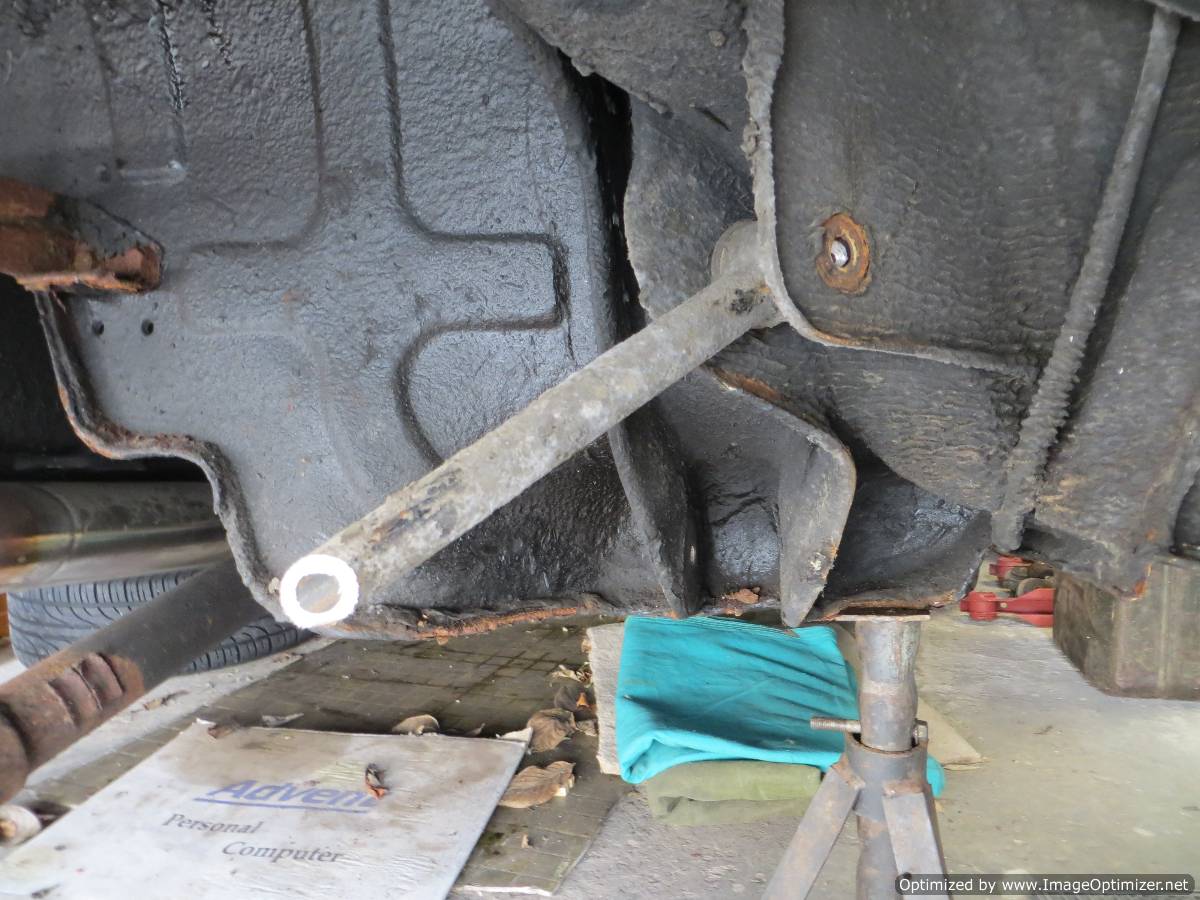
Special tool no.2 in use. The larger piece of wood
is used as a lever against the engine mounting bracket.
With the new bush in place it has transformed the driving experience, no vibration or rattles from the steering wheel now. Just wish I had done it sooner!
..................................................

17th May 2015. GLAVON  May Blossom Run

I belong to the GLAVON group of the TR Register (as well as the TRDC) and they had organised a nice little run out last Sunday 17th May.  It was a "convoy rules" run so no navigation required which meant my other half could enjoy coming along as she gets ill if proper navigation is required. Twelve assorted TR's set off from Tetbury on a lovely day covering a 70 odd mile route around the Cotswold lanes ending up at a fellow members house near Bisley for an excellent outdoor lunch. We had a mixture of TR4's, TR5's, TR6's and two TR7's.  We certainly got a lot of attention as the convoy passed through some of the Cotswold tourist spots like Buscot, Coleshill and Bibury. I think we must be on a hundred pictures taken by the Chinese tourists in Bibury alone!

The new steering bush means the TR7 is pretty civilised now, and I am very impressed by how it rides on some of the bumpy roads we have in this area. According to the receipts I have from the previous owner the springs are uprated ones from S&S and dampers are KYB. It gives a nice combination of handling and ride comfort, just what I would have chosen myself for everyday motoring. It would be too soft for any serious work but that's not what I want the car for.
Some of the GLAVON cars at the lunch halt.

Tuesday, 2 July 2013

July 2013. Blue car goes to bodyshop/ red car MOT

Looks OK from a distance. The hardtop is on because I took the hood off to aid welding. 
1st July.  After all the dramas getting fuel tank sorted for the MOT I took the car down to the bodyshop today.    It was not without last minute dramas however.  Drove it out of the garage OK and parked it to go indoors and collect phone, money etc.  Got back in to drive off and it would not start, no sparks at all.

Bit of a Victor Meldrew moment -  I DON'T BELIEVE IT!!.

It had cut out randomly on me a few times before.  No other symptoms just a sudden cut like you switched off but it had always re-started immediately. I had previously found a loose earth connection for the Lumenition and thought that was the problem but it obviously was not. At least now with a total failure I was able to do some proper fault finding. Following the Lumenition diagnostics that I was able to print off their website I finally tracked it down using a voltmeter to the optical unit in the distributor.
Good news - I had a spare.
Bad news - the distributor had to come out to fit it.
So instead of a quick drive to the bodyshop I spent the whole day taking out and replacing the distributor.

Finished the job at 4:30pm and it runs fine now, so was able to deliver it after all.  Phew !!
Reasons for the work can be seen in the pictures below.

Nearside wing

Offside wing

Nearside wheelarch trouble

July 11th.   The bodyshop has started work on the blue car now and revealed some of the gory details

Outer wheel arch cut away to reveal rusty inner
We found the previous arch repair panel had barely been welded at all !

Rusted inner arch and sill sections now removed
ready to install new repair panels


Closeup of lower wing area 
+++++++++++++++++++++++++++++++++++++++++++++++++++++++++++++++

Old Red car update July 12th.  


July 2013 - looks OK from here
Like I said in a previous post, the intention is to get the blue car bodywork up to a decent standard and then swap my good oily bits over from the old red car I have had since 2002. Because of the limited garage space this means I need to keep the red one road legal long enough to swap the bits over. After that the body can be stripped of any useful stuff and scrapped.  There is an MOT coming up later this month so I was having a poke around and guess what I found, see the picture

Nasty surprise in the nearside sill
Its going to need a quick repair job to get an MOT test.  Not what I needed just now.

Latest news: sill has been patched and the car has a new MOT so its road legal for another year - or as long as I need it to be until I nick all the good bits off it!
............................................................................

One of those good bits will be a neat finisher for the top of the gear lever gaiter. The original rubber ones on most TR7's have given up long ago but a guy called William Parris in the USA was making some replacements and sent me one.
William Parris finisher fitted below the wooden gearknob.


+++++++++++++++++++++++++++++++++++++++++++++++++++++++++++++++++++++++

Blue car update  17th July.

Popped into the body shop for a look at how they are getting on.  The offside wheel arch metalwork is now finished, just waiting for its skim of filler etc.  They showed me the old arch that a previous repairer had fitted and turns out it was only just welded in a couple of spots, the rest was done with seam sealer. Not good.

New inner arch fitted

Right side outer panels now fitted
............................................................................................................................


Left side outer panels fitted ready for filler and paint


The guys in the body shop did moan to me that the repair panels I supplied didn't fit too well. Apparently they had to make at least four cuts in the inner wing repair panels to get them anywhere near to correct shape so that is not good to hear.  Because of stock problems I had bought one of them from Rimmers and one from Robsport so seems the suppliers to both are equally bad - or is it the same source?

~~~~~~~~~~~~~~~~~~~~~~~~~~~~~~~~~~~~~~~~~~~~~~~~~~~~~~~~~~~~~

Update  21st August.  Not too much progress to report, bodyshop boys have been on holidays and working on new car accident stuff so the TR has been mostly gathering dust but it has had a first coat of primer and a contrast mist coat to show any imperfections up before final colour is applied.

Right side before final wet & dry

Left side before final wet & dry
....................................................................................................


30th August update:   Called by the bodyshop today to see if there was any progress and found the final primer was on and flatted back ready to paint.  Seems they had the car set up in the spraybooth ready to paint yesterday and when they went to mix the paint they found the paint code is wrong.  Turns out the one on the car says its Persian Aqua but of course it isn't.  
Apparently when it was "restored" by a previous owner years ago they changed the colour at the same time. My boys sent the bootlid to their paint supplier who scanned it to identify the real colour and paint is now ready to go. Should get painted over the weekend.

Here it is, stonechipped and ready for paint.


Monday, 20 May 2013

2013 - The New Blue Car Project Begins

I had realised back in 2010 that my original TR7 I bought in 2002 was not going to last too much longer.  The previous owner had done quite a lot of welding but it was not very good quality and I found some important bits he missed, or rather the MOT man did.  Almost at the same time I bought another TR7 which was an abandoned project and was structurally sound.  See my previous post about this with some pictures.

However when I started to get serious about the project I found that the interior had got wet at some time so was actually in a poor condition and would all need replacing.  Also when I got a quote for a decent paint job it came to almost £1500.  This meant there was much more work - and expense - in putting it back on the road to the standard I wanted so I decided to sell it.  Less than two weeks later it had gone to a new home up near Manchester.

Looking round for a replacement I found a good looking  1981 Midnight Blue TR7 on Ebay and bought it for less than the price of painting the old one.  It was pretty tidy and had quite a lot of good stuff already done, like uprated brakes and suspension, 15" wheels, stainless exhaust, electric fan, electronic ignition etc etc.    It had some restoration done previously but there were a couple of spots still  needing attention, mainly the front of the rear wing just above where it joins the sill. This is a regular TR7 problem area and repair panels are easily available.

May 2013.  The car was booked into a good local bodyshop but the MOT test expires on 1st June so I took it for a test not expecting any trouble.

Wrong.

The tester pointed out a badly corroded fuel tank strap that would need  replacement before he could pass it..
Yes, its completely broken!


I ordered some new straps from Robsport and started to get the axle out to give access to the tank. This is when the fun started.

Someone had been at the axle bolts before me and they were mostly rounded off so this was going to be fun.


Out came the grinder to take the heads off and things were going pretty well with showers of sparks until I noticed something was dripping amid all the sparks. It was petrol !!!


Yes, that is petrol leaking!


I only just touched the spot where the petrol was coming from and the sealer came away to reveal petrol dripping in a steady stream from the tank.  Not good.


Hmmmm, I think any more grinding will have to wait till the leak had stopped.   I drained as much as possible (about 6 gallons)  from the tank and left it dripping into an old washing up bowl overnight.


Next morning the drips had stopped and I was able to get the axle out completely, but not before some more grinding.  The upper link bolts at the body end are harder to access so I had to cut though the links.
Bolts cut off with the grinder.


It seems a bit brutal but it was the best way to get at those top link to body bolts. I do have a some old suspension links "in stock" so temporary replacements are no problem.


Top link sawn off
to aid access to bolts


So the axle is now on the floor and the new tank mounting straps are on their way from Robsport.  


Axle finally out


I found a replacement tank in Aberdeen via the TR7/8 Forum  and did a deal at a good price.  By a amazing stroke of good luck a friend in Aberdeen ( John Roberts ) is coming down to Gloucestershire in the next couple of days  to collect a Fiat 124 Coupe he has bought from Stroud and will bring the tank down with him.


Update: 22 May 2013.  My friend John has delivered the tank which looks pretty good but has obviously been sitting for a while and has something making sloshing noises inside.  He also gave me some fuel tank restorer/sealer stuff that he had left over to treat it before I install it.  

23 May 2103.  The tank treatment is in three parts, a cleaner/degreaser,  an etching solution and finally the actual sealer. I have done the first two giving them a good "slosh around" - that is the actual term used on the products labels - and its now waiting to air dry before adding the sealer.  I will also give it a good external paint layer for protection before fitting.

Replacement tank during treatment

Wednesday, 20 February 2013

2010, non-starter. Bugger!

So the scene moves on to 2010. I went to get the car out of the garage and it wouldn't start, well it would fire OK but wouldn't run.  It had been standing for a couple of months over the winter.  The fuel tank was a bit low so I added some fresh petrol and tried again.  Still would not run.
It was firing OK but that was all.  Hmmm.
Dirt in the fuel line/pump maybe?
Flushed it all through, cleaned out the pump filter and tried again.  Still the same. Hmmmmmm.
Checked the float chambers to see if they were clean but found the fuel level well down,  Ah, dodgy fuel pump maybe?  Fitted the spare fuel pump ( we all have one I assume?) and tried again.
YES, SORTED, RUNS OK !!
Then I noticed the fuel leak, petrol was dripping from the new fuel pump. I found there was no way I could get the lid to seal properly. It was one I had bought ages ago "just in case" from Ebay- like one does - so no hope of a refund.
Robsport came to the rescue with a new one delivered next day and worked a treat.

BACK ON THE ROAD AGAIN.  yeeeehaa.


Saturday, 2 February 2013

2009, New Suspension

In 2009, after 36 years,  BT offered me money to leave and not wishing to be rude I accepted their kind offer.  I decided pretty quickly in case they changed their mind!

Now being officially retired meant I had more time to spend working on the TR7, but the better half also had plans for the house so I couldn't spend all my time in the garage just yet.

Driving the car more also meant the poor condition of the suspension became more obvious.  The ride was generally not very good so I decided that new springs and dampers were called for.  Not surprisng really, as they appeared to be the original ones fitted in 1980. This is a pretty simple job on the TR7, the biggest problem was battling with the spring clamps on the front struts. This is a bit scary as there is a lot of potential energy stored when you have a road spring fully compressed, but I managed it without losing any fingers. I also fitted a set of roller bearings in the strut top mountings to improve the steering.

With the ride now improved, other things started to suggest themselves to me. I decided a set of polybushes for the suspension would be a good idea and I would also like to upgrade the front brakes at some time.

Polybushes must be one of the best things to do on an old car.  They are much easier to fit than replacement rubber ones and they are said to last for ever.  You can get a variety of different grades to suit all driving styles from soft road to hard race settings. Mine are somewhere in between.  I also replaced the front subframe mountings with polybushes at the same time. Interestingly the old subframe mountings I took out were standard rubber but seemed almost  new so I kept them "just in case".

The front subframe job is another slightly scary one. The engine has to be supported separately whilst the subframe with all the suspension and steering attached is lowered.  There are four long bolts holding the subframe to the chassis rails and all mine came out nicely.  I have heard these can be a problem sometimes as they seize and have to be sawn off.  Not a nice thought.  Bit of a fiddle lining it all back up but it went together  pretty well.  The manuals do not show the layout of these bushes very well but luckily one of the guys on the TR7/8 Forum (Odd Hedberg from Sweden)  has produced photos showing the proper sequence which makes it all very simple.
Odd Hedberg's Excellent Pictures

Better handling and steering were obvious as soon as I drove the car so what to do next?
----------------------------------------------

Rear Axle Bump Stops.  Working on the rear suspension I happened to touch one of the axle bump stops and it just fell off.  Turns out it was some kind of original foam material and it just fell apart - perhaps not too surprising after 30 years.  I spoke to Robsport about new ones and decided that the cheaper rubber ones would be fine, no need for the much more expensive poly ones. The way I figure it 10-15 years with the rubber ones will see me out anyway.

Fittting them was interesting. No way could I get them to push into the chassis mounting hole so I devised a special tool method as shown in the pictures.
Just needs a piece of wood cut to length and a Jubilee clip (hose clip).
Apply plenty of lubrication and fit the Jubilee clip (not too tight) round the mounting lug.  
Then with the piece of wood in place as shown you can jack up the axle which pushes the bump stop into its mounting hole, taking the Jubilee clip off once the mounting lug has engaged.   EASY.

Wood block and Jubilee clip in place

Jacking pressure applied,  now remove Jubilee clip

Tuesday, 29 January 2013

2008, Exhaust Manifold and Fan Problems

Now I had started driving it again it wasn't long before I found the exhaust manifold was starting to develop a leak.  The car had a mild steel tubular manifold when I bought it but sitting around unused for a couple of years had obviously allowed it to rust and get thin enough to crack in a couple of  places.  Luckily I had a new one in stock that I had acquired during the cars lay-up for just such a problem.  The new one was another mild steel tubular manifold that I got from Robsport via Ebay for a very good price.  The rest of the car's exhaust was stainless steel so no corrosion problems there.

Guess what?  Fitting the new manifold turned out to be a bit more of a problem than I expected - surprise, surprise.

Its a two man job to get it all lined up so I asked Chris Riley ( old mate and ex service crew from my rallying days) to help get it all lined up. We also had to make up a short sleeve joining piece as the two pipes were the same size.  The bolts into the head were also a pain with one starting to strip and a couple of others suspect.  They also turned out to be different sizes so the previous owner had also had a similar problem with them, but it all went together and we were mobile again..

Now back from being laid up it was not long before the next problem developed, there was a loud groan/rattle from the front of the engine. I recognised it from my Stag days and it didn't take long to trace the source to the viscous coupling unit on the cooling fan.  New ones were quite expensive at about £50 or more so I chose to go electric instead.

The first choice for an electric fan kit is usually the Kenlowe, but these are not cheap either at over £100. Best way I found was to buy the parts separately which I did from Ebay (again) for just over £60.  This consisted of a new 14" fan, a mounting kit and a thermostat control kit.   Oh, and you need a new much shorter fan belt as well.

All the old viscous stuff and the idler carrying it could now come off the timing cover and it turned out to weigh a ton, well OK not a ton, but its pretty darned heavy and it makes the front of the engine bay much more open as well.

Installation was pretty easy, just needed to fit a relay and sort out a power feed.  Now let the engine warm up and just dial in the temperature you want the fan to start.  I chose a temperature reading of just over half on the gauge and this seems to work well.  The fan rarely cuts in except in traffic.